Development Usage
Please note! This Docker setup is not for production!
Quickstart
See Quickstart.
Intro
Assuming you have Docker, Docker Desktop, Moby or some remote Docker host configured, up and running from here on. Also assuming you have Java and Maven installed, as you are at least about to develop code changes.
To test drive these local changes to the Dataverse codebase in a containerized application server (and avoid the setup described in Development Environment), you must a) build the application and b) run it in addition to the necessary dependencies. (Which might involve building a new local version of the Config Baker Image.)
Building
To build the application and config baker image, run the following command:
mvn -Pct clean package
Once this is done, you will see images gdcc/dataverse:unstable and gdcc/configbaker:unstable available in your
Docker cache.
Note: This will skip any unit tests. If you have built the code before for testing, etc. you might omit the
clean to avoid recompiling.
Note: Also we have a docker-compose-dev.yml file, it’s currently not possible to build the images without
invoking Maven. This might change in the future.
Running
After building the app and config baker image containing your local changes to the Dataverse application, you want to run it together with all dependencies. There are four ways to do this (commands executed at root of project directory):
Both ways have their pros and cons:
In case you want to concatenate building and running, here’s a cheatsheet for you:
Once all containers have been started, you can check if the application was deployed correctly by checking the version at http://localhost:8080/api/info/version or watch the logs.
Note: To stop all containers you started in background, invoke mvn -Pct docker:stop or
docker compose -f docker-compose-dev.yml down.
Check that you can log in to http://localhost:8080 using user dataverseAdmin and password admin1.
You can also access the Payara Admin Console if needed, which is available at http://localhost:4848. To log in, use
user admin and password admin. As a reminder, the application container is for development use only, so we
are exposing the admin console for testing purposes. In a production environment, it may be more convenient to leave
this console unopened.
Note that data is persisted in ./docker-dev-volumes in the root of the Git repo. For a clean start, you should
remove this directory before running the mvn commands above.
Viewing Logs
In case you started containers in background mode (see Running), you can use the following commands to view and/or watch logs from the containers.
The safe bet for any running container’s logs is to lookup the container name via docker ps and use it in
docker logs <name>. You can tail logs by adding -n and follow them by adding -f (just like tail cmd).
See docker logs --help for more.
Alternatives:
In case you used Maven for running, you may use
mvn -Pct docker:logs -Ddocker.filter=<service name>.If you used Docker Compose for running, you may use
docker compose -f docker-compose-dev.yml logs <service name>. Options are the same.
Accessing Harvesting Log Files
1. Open a terminal and access the Dataverse container.
Run the following command to access the Dataverse container:
docker exec -it dev_dataverse bash
This command opens an interactive shell within the dev_dataverse container.
2. Navigate to the log files directory.
Once inside the container, navigate to the directory where Dataverse logs are stored:
cd /opt/payara/appserver/glassfish/domains/domain1/logs
This directory contains various log files, including those relevant to harvesting.
3. Create a directory for copying files.
Create a directory where you’ll copy the files you want to access on your local machine:
mkdir /dv/filesToCopy
This will create a new folder named filesToCopy inside /dv.
4. Copy the files to the new directory.
Copy all files from the current directory to the newly created filesToCopy directory:
cp * /dv/filesToCopy
This command copies all files in the logs directory to /dv/filesToCopy.
5. Access the files on your local machine.
On your local machine, the copied files should appear in the following directory:
docker-dev-volumes/app/data/filesToCopy
Redeploying
The safest and most reliable way to redeploy code is to stop the running containers (with Ctrl-c if you started them in the foreground) and then build and run them again with mvn -Pct clean package docker:run.
Safe, but also slowing down the development cycle a lot.
Triggering redeployment of changes using an IDE can greatly improve your feedback loop when changing code. You have at least two options:
Use builtin features of IDEs or IDE plugins from Payara.
Use a paid product like JRebel.
The main differences between the first and the second options are support for hot deploys of non-class files and limitations in what the JVM HotswapAgent can do for you. Find more details in a blog article by JRebel.
IDE Triggered Code Re-Deployments
To make use of builtin features or Payara IDE Tools (option 1), please follow steps below. Note that using this method, you may redeploy a complete WAR or single methods. Redeploying WARs supports swapping and adding classes and non-code materials, but is slower (still faster than rebuilding containers). Hotswapping methods requires using JDWP (Debug Mode), but does not allow switching non-code material or adding classes.
- Download the version of Payara shown in Install Payara and unzip it to a reasonable location such as
/usr/local/payara7.- Note that Payara can also be downloaded from Maven Central.- Note that another way to check the expected version of Payara is to run this command:mvn help:evaluate -Dexpression=payara.version -q -DforceStdout Install Payara Tools plugin in your IDE:
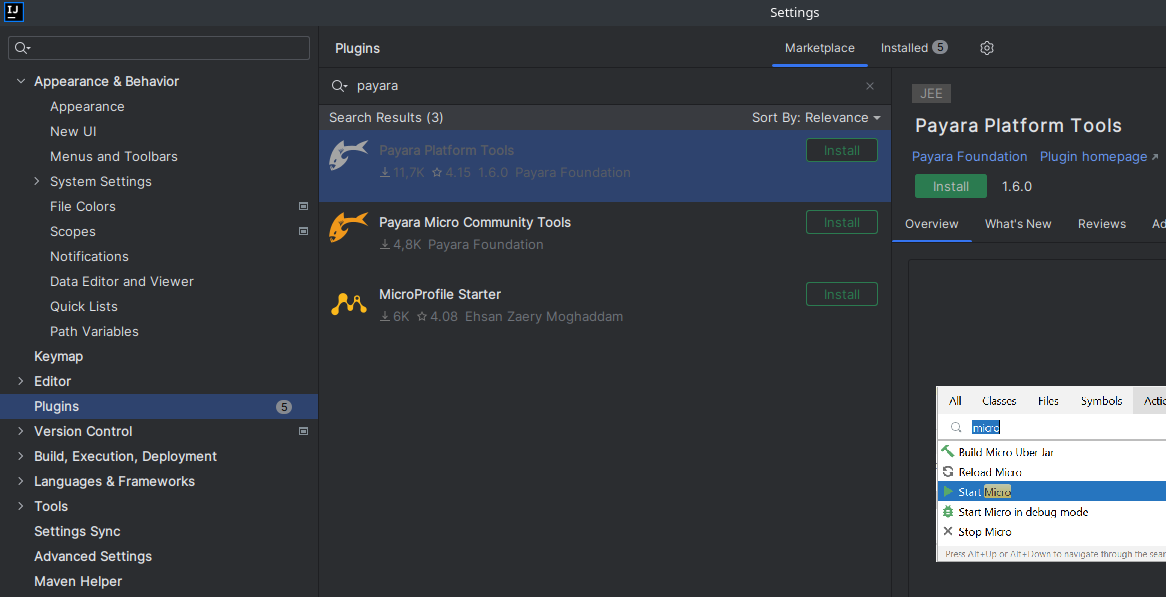
This step is not necessary for Netbeans. The feature is builtin.
Requires IntelliJ Ultimate! (Note that free educational licenses are available)
Go to settings, then plugins. Install “Payara Ultimate Tools”. For more information:
Configure a connection to Payara:
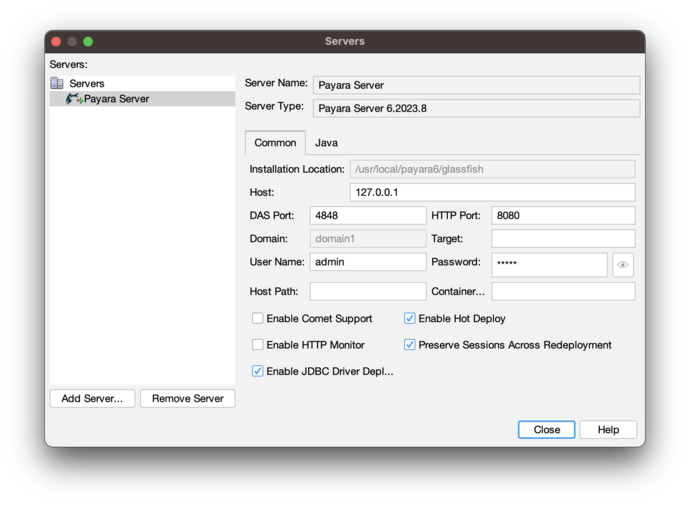
Launch Netbeans and click “Tools” and then “Servers”. Click “Add Server” and select “Payara Server” and set the installation location to
/usr/local/payara7(or wherever you unzipped Payara). Choose “Remote Domain”. Use the settings in the screenshot below. Most of the defaults are fine.Under “Common”, the username and password should be “admin”. Make sure “Enable Hot Deploy” is checked.
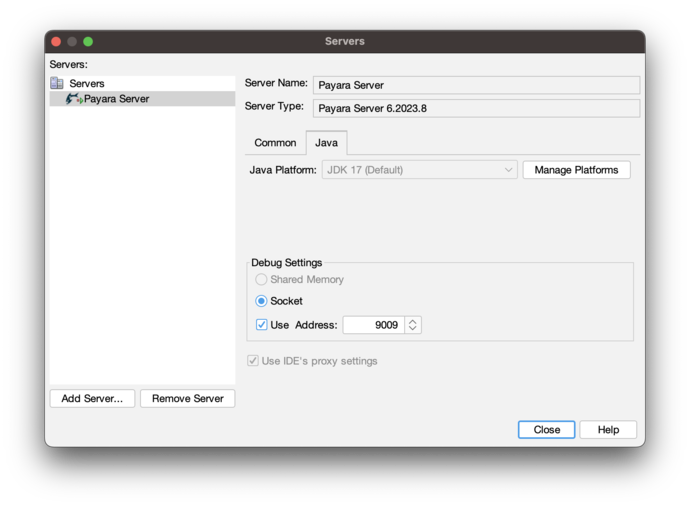
Under “Java”, change the debug port to 9009.
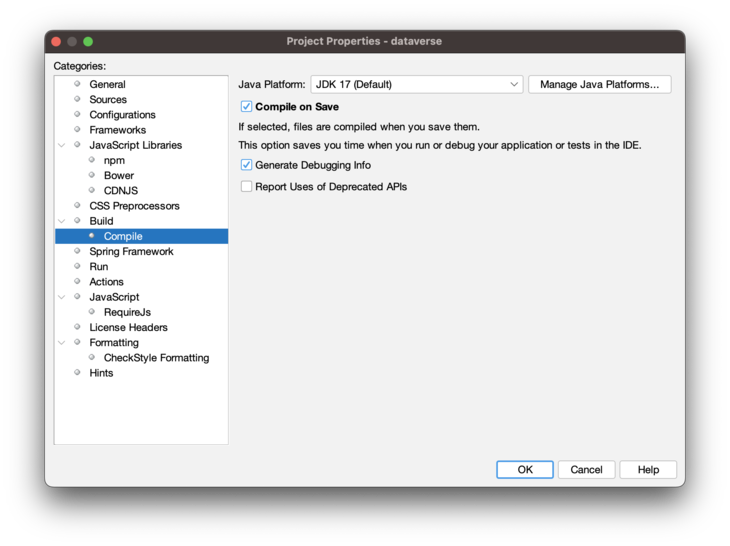
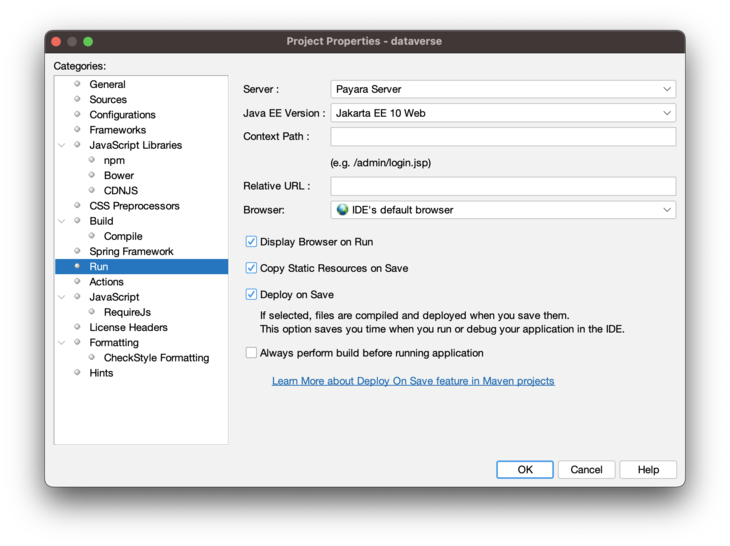
Open the project properties (under “File”), navigate to “Compile” and make sure “Compile on Save” is checked.
Under “Run”, under “Server”, select “Payara Server”. Make sure “Deploy on Save” is checked.
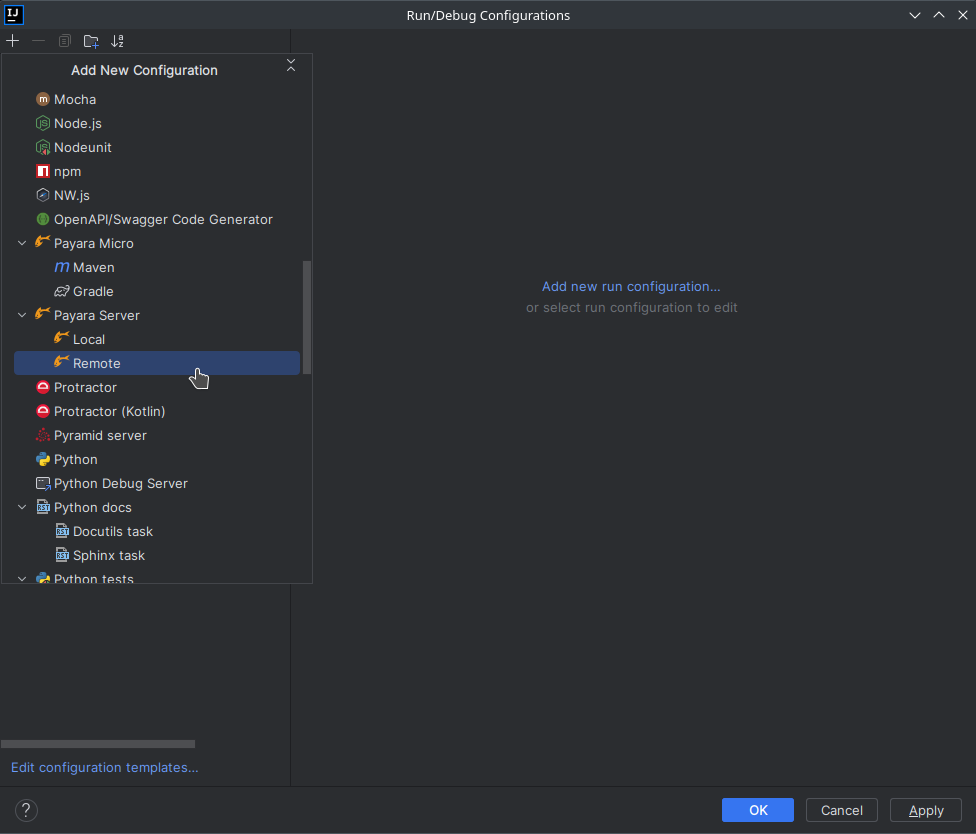
Create a new running configuration with a “Remote Payara”. (Open dialog by clicking “Run”, then “Edit Configurations”)
Click on “Configure” next to “Application Server”. Add an application server and select unzipped local directory.
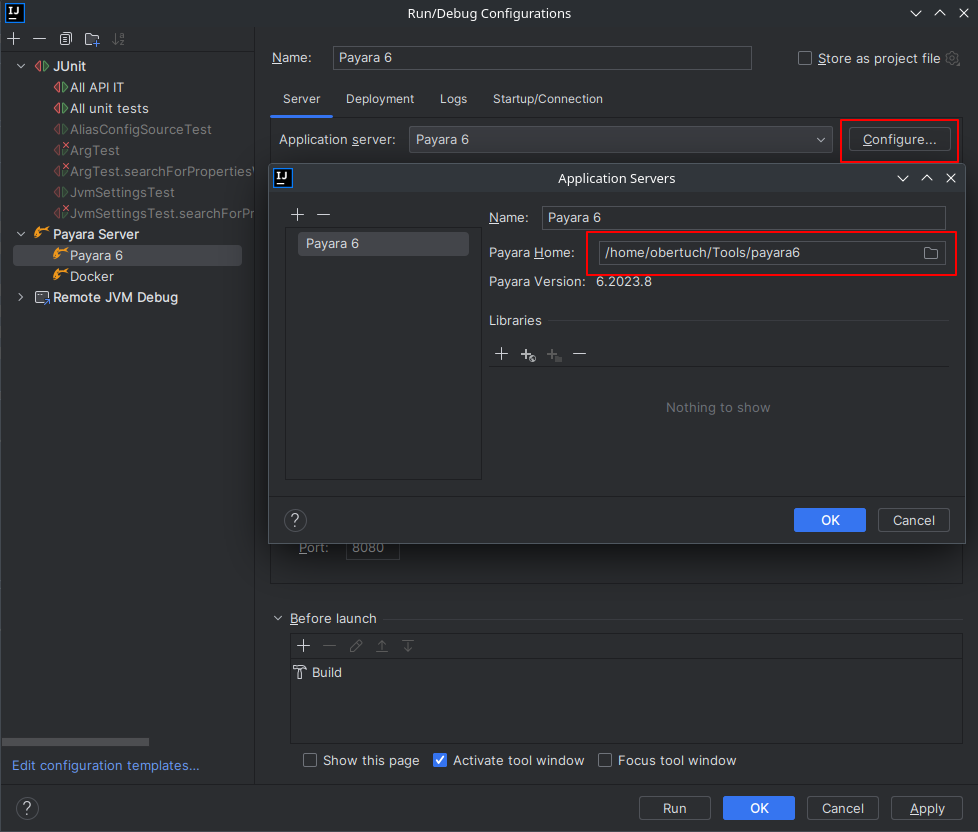
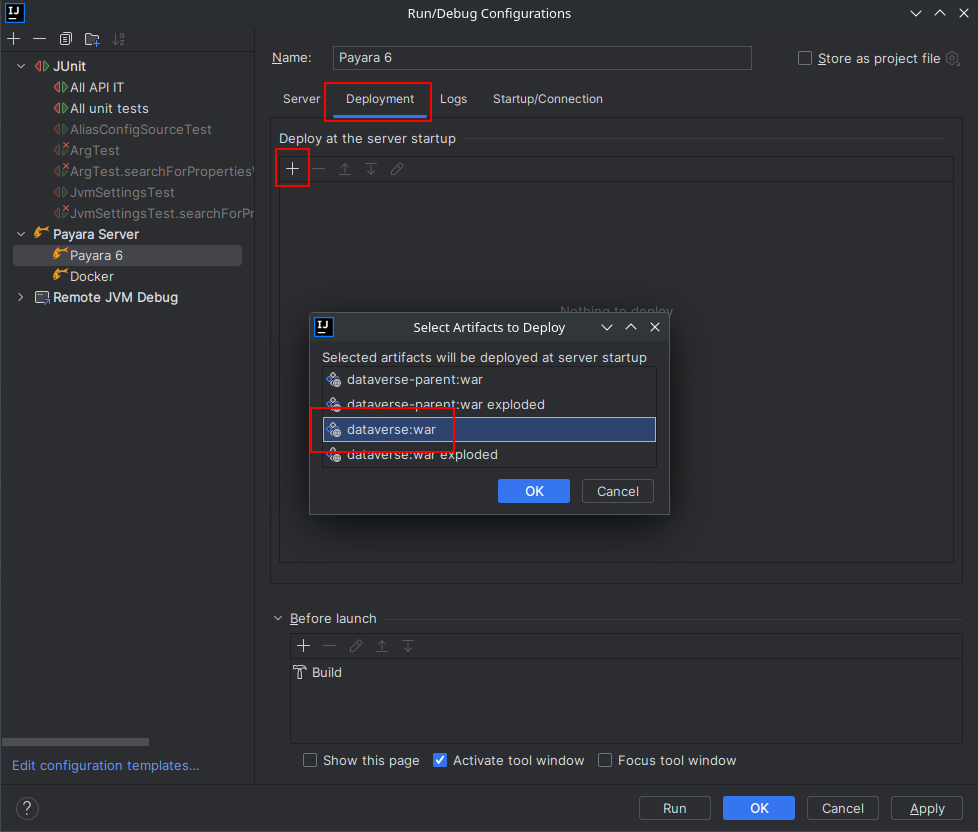
Add admin password “admin” and add “building artifact” before launch. Make sure to select the WAR, not exploded!
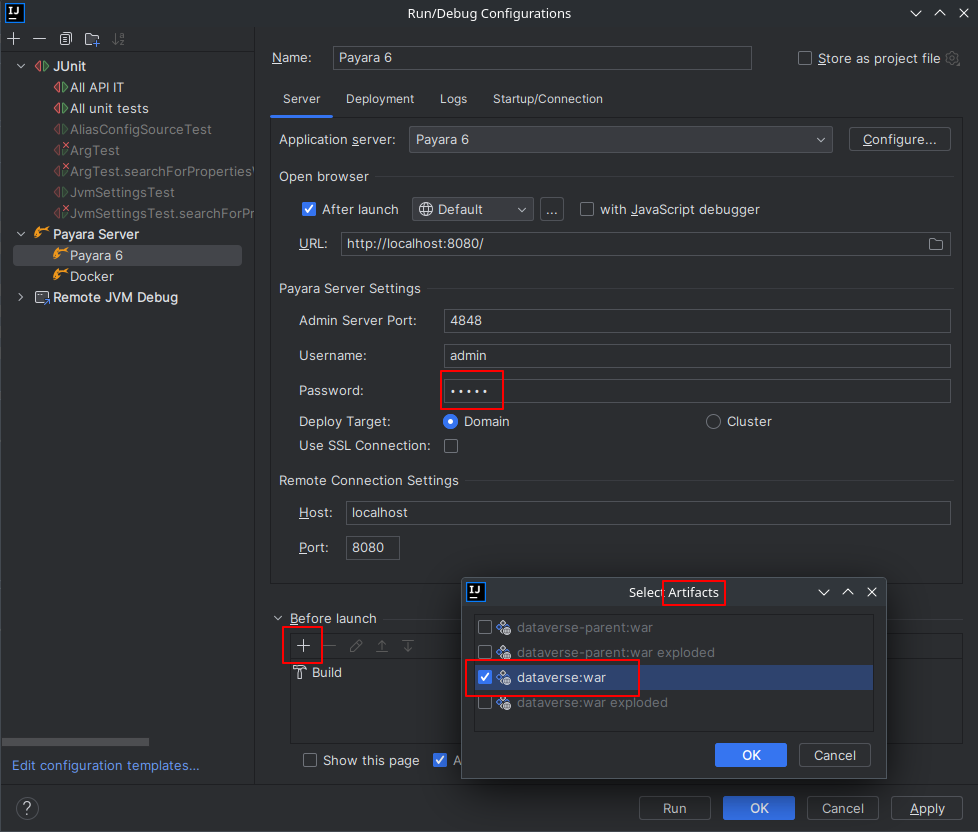
Go to “Deployment” tab and add the Dataverse WAR, not exploded!.
Go to “Startup/Connection” tab, select “Debug” and change port to
9009.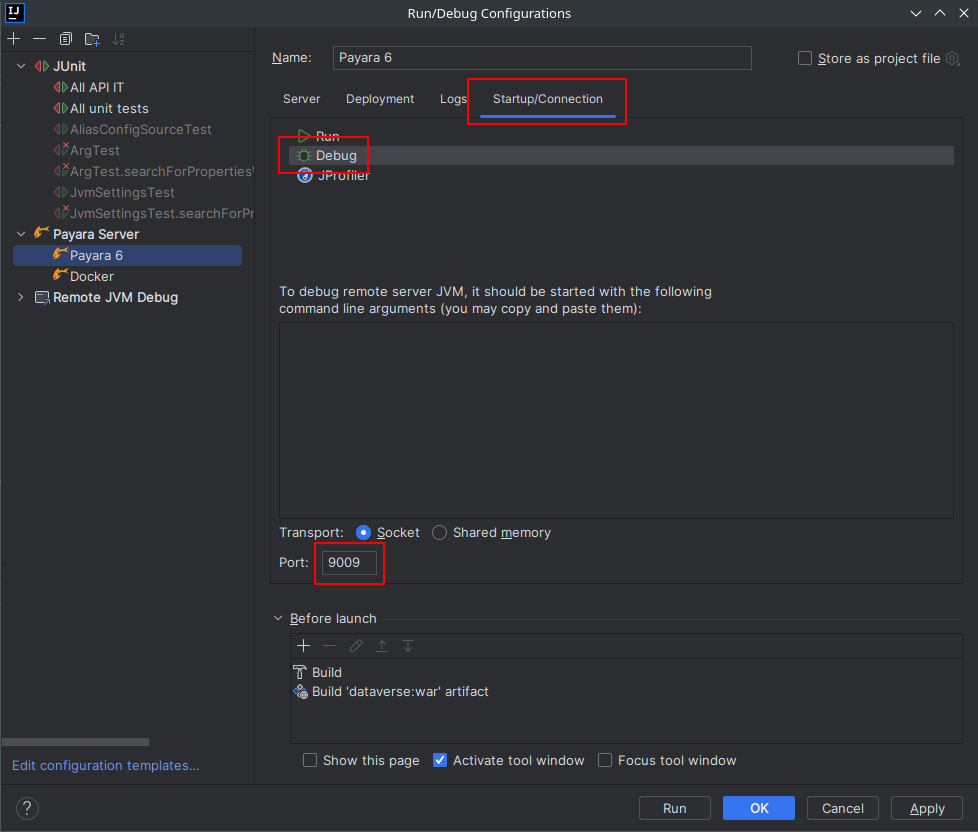
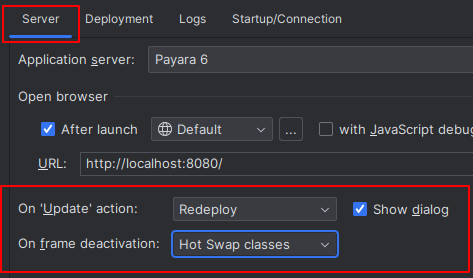
You might want to tweak the hot deploy behavior in the “Server” tab now. “Update action” can be found in the run window (see below). By default it is “Hot Swap classes”, which works fine, but as the screenshot shows you can also change it to “Redeploy”. “Frame deactivation” means switching from IntelliJ window to something else, e.g. your browser. Note: static resources like properties, XHTML etc will only update when redeploying!
Start all the containers, but take care to skip application deployment.
mvn -Pct docker:run -Dapp.skipDeployRun above command in your terminal to start containers in foreground and skip deployment. See cheat sheet above for more options. Note that this command either assumes you built the Application Image first or will download it from Docker Hub.
SKIP_DEPLOY=1 docker compose -f docker-compose-dev.yml upRun above command in your terminal to start containers in foreground and skip deployment. See cheat sheet above for more options. Note that this command either assumes you built the Application Image first or will download it from Docker Hub.
Note that you can skip this step if you’re ok running the command under the “Maven” tab, which is this:
mvn -Pct docker:run -Dapp.skipDeployIn IntelliJ you can create a service configuration to automatically start services for you.
IMPORTANT: This requires installation of the Docker plugin.
NOTE: You might need to change the Docker Compose executable in your IDE settings to
dockerif you have nodocker-composebinary. Start from theFilemenu if you are on Linux/Windows orIntelliJ IDEAon Mac and then go to Settings > Build > Docker > Tools.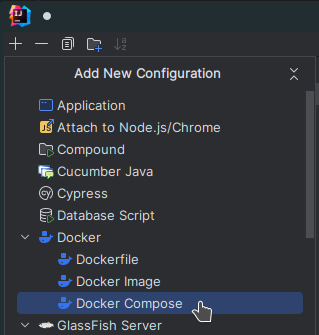
Give your configuration a meaningful name, select the compose file to use (in this case the default one), add the environment variable
SKIP_DEPLOY=1, and optionally select the services to start. You might also want to change other options like attaching to containers to view the logs within the “Services” tab.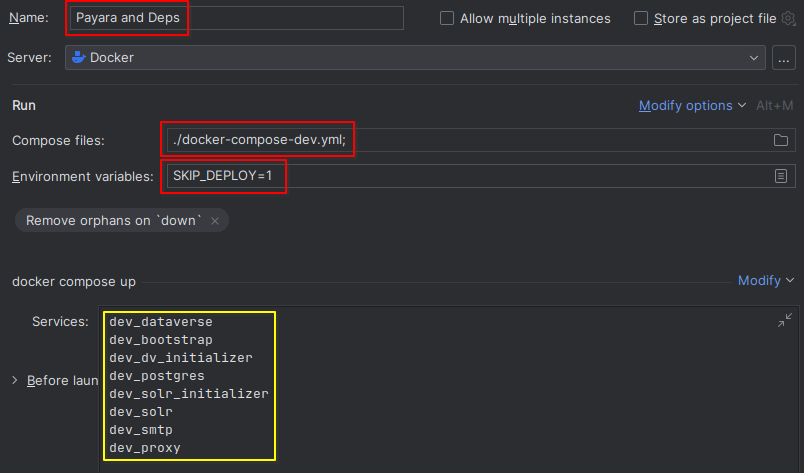
Now run the configuration to prepare for deployment and watch it unfold in the “Services” tab.

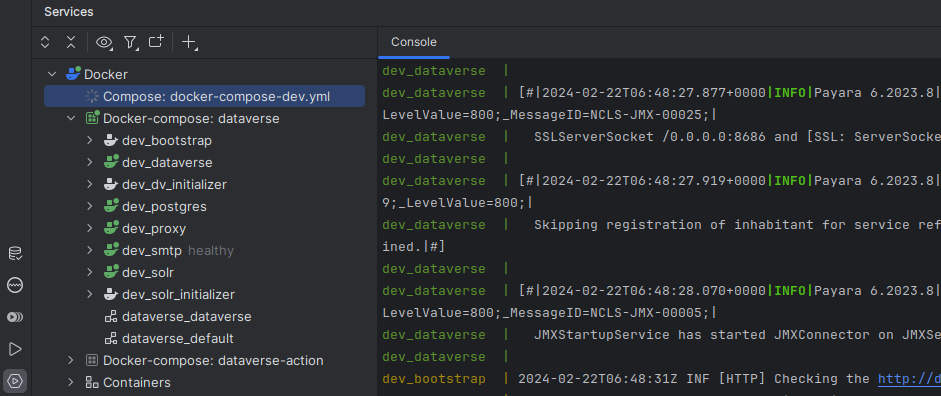
Note: the Admin Console can be reached at http://localhost:4848 or https://localhost:4949
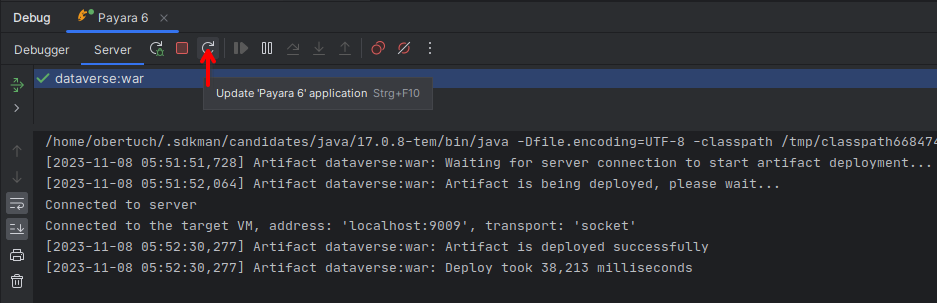
To deploy the application to the running server, use the configured tools to deploy. Using the “Run” configuration only deploys and enables redeploys, while running “Debug” enables hot swapping of classes via JDWP.
Click “Debug” then “Debug Project”. After some time, Dataverse will be deployed.
Try making a code change, perhaps to
Info.java.Click “Debug” and then “Apply Code Changes”. If the change was correctly applied, you should see output similar to this:
Classes to reload:
edu.harvard.iq.dataverse.api.Info

Code updated
Check to make sure the change is live by visiting, for example, http://localhost:8080/api/info/version
See below for a video demonstrating the steps above but please note that the ports used have changed and now that we have the concept of “skip deploy” the undeployment step shown is no longer necessary.
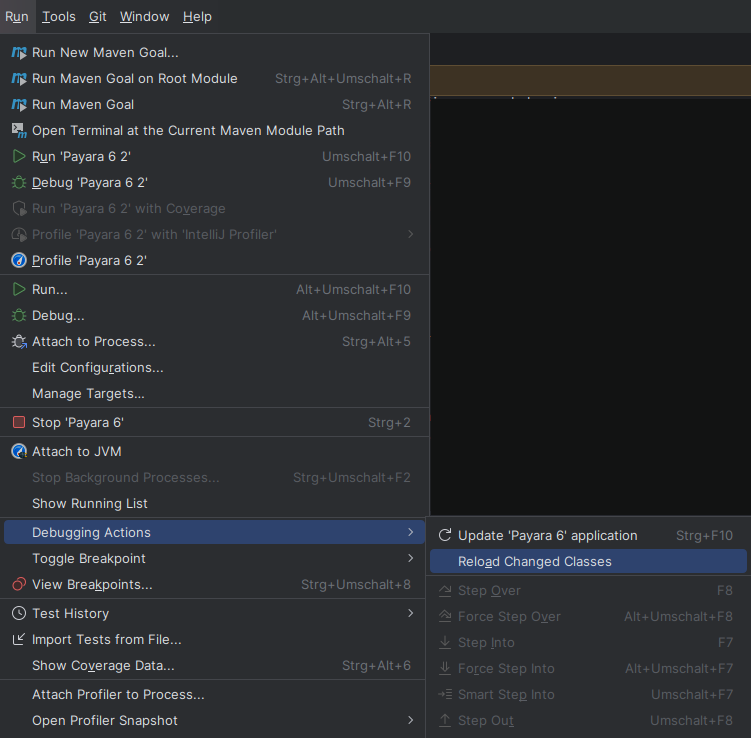
Choose “Run” or “Debug” in the toolbar.

Watch the WAR build and the deployment unfold. Note the “Update” action button (see config to change its behavior).
Manually hotswap classes in “Debug” mode via “Run” > “Debugging Actions” > “Compile and Reload Modified Files”.
Note: in the background, the bootstrap job will wait for Dataverse to be deployed and responsive. When your IDE automatically opens the URL a newly deployed, not bootstrapped Dataverse application, it might take some more time and page refreshes until the job finishes.
IDE Triggered Non-Code Re-Deployments
Either redeploy the WAR (see above), use JRebel or look into copying files into the exploded WAR within the running container. The steps below describe options to enable the later in different IDEs.
This imitates the Netbeans builtin function to copy changes to files under src/main/webapp into a destination folder.
It is different in the way that it will copy the files into the running container deployment without using a bind mount.
Install the File Watchers plugin
Import the
watchers.xmlfile at File > Settings > Tools > File WatchersOnce you have the deployment running (see above), editing files under
src/main/webappwill be copied into the container after saving the edited file. Note: by default, IDE auto-saves will not trigger the copy.Changes are visible once you reload the browser window.
IMPORTANT: This tool assumes you are using the IDE Triggered Code Re-Deployments method to run Dataverse.
IMPORTANT: This tool uses a Bash shell script and is thus limited to Mac and Linux OS.
Fast Redeploy (Command-Line)
For developers who prefer command-line workflows over IDE integration, Dataverse provides scripts for fast iterative development without full container rebuilds.
Initial Setup
Run once per development session:
./scripts/dev/dev-start-frd.sh
This command:
Builds the full Dataverse WAR with
mvn packageExtracts it into
target/dataverse/as an exploded WARConfigures JPA settings for development (
ddl-generation=none)Starts the dev stack with
SKIP_DEPLOY=1Manually deploys the application via
asadmin
Iterative Development
After making code changes, run:
./scripts/dev/dev-frd.sh
This script:
Compiles Java sources incrementally (
mvn compile, ~5-10s)Syncs updated classes and webapp resources into the mounted exploded WAR
Forces Payara to redeploy the application without restarting containers
Key features: - Skips full Maven rebuilds (only compiles changed Java files) - Avoids container restarts (uses hot-redeployment) - Completes in ~12 seconds vs. ~54s for traditional full rebuild workflow (4.5x faster) - Preserves database state between deployments
Typical Workflow
# Start dev environment once
./scripts/dev/dev-start-frd.sh

# Edit Java or XHTML files...

# Fast redeploy
./scripts/dev/dev-frd.sh

# Repeat as needed

# When finished, stop containers
./scripts/dev/dev-down-frd.sh
Memory Configuration
The fast-redeploy workflow includes docker-compose.override.yml that increases the memory limit to 8GB
(from the default 2GB limit set for GitHub Actions CI) which is insufficient for local Dataverse development.
The override file is automatically used by the scripts.
Limitations
Does not update dependencies (run full
mvn package+ restart ifpom.xmlchanges)Static resources (CSS, JS) may require browser cache clear
For database schema changes, use
dev-rebuild.shinsteadPerformance timings may vary depending on your hardware configuration
Note: This workflow complements IDE-based redeployment. Use whichever fits your development style.
Exploring the Database
See Database Name and Credentials in the Developer Guide.
Using a Debugger
The Base Image enables usage of the Java Debugging Wire Protocol
for remote debugging if you set ENABLE_JDWP=1 as environment variable for the application container.
The default configuration when executing containers with the commands listed at Running already enables this.
There are a lot of tutorials how to connect your IDE’s debugger to a remote endpoint. Please use localhost:9009
as the endpoint. Here are links to the most common IDEs docs on remote debugging:
Eclipse,
IntelliJ
Building Your Own Base Image
If you find yourself tasked with upgrading Payara (or reviewing or testing such an upgrade), you will need to create your own base image before running the Quickstart. For instructions, see Build Instructions under Base Image.